
Houseplant Fertilizer: 7 Pro Secrets for Thriving Growth


Providing the correct nutritional support is one of the most transformative elements of indoor plant cultivation. I am Dennis P. Hansen, and in my decades of tending indoor greenery, I have seen how the right application of houseplant fertilizer can revitalize pale foliage, trigger vigorous root development, and sustain abundant new growth. In this comprehensive guide, you will master the biological fundamentals of plant nutrition, understand N-P-K ratios, compare liquid versus slow-release formulas, and learn how to avoid toxic mineral salt accumulation.
Table of Contents
- The Biology of Plant Nutrition: Macro and Micronutrients
- Substrate pH and Cation Exchange Capacity
- Decoding N-P-K Ratios for Indoor Foliage
- Liquid vs. Slow-Release vs. Organic Fertilizers
- Houseplant Fertilizer Selection Matrix
- The 4-Step Application Protocol to Prevent Root Burn
- Natural Amendments: Worm Castings and Compost Teas
- Dennis’s Advanced Troubleshooting: Fertilizer Burns & Deficiencies
- Seasonal Feeding Schedules: Spring Through Winter
- Master FAQ: Houseplant Fertilizer Answered
The Biology of Plant Nutrition: Macro and Micronutrients
A common misconception among beginner gardeners is that fertilizer serves as “plant food.” In botanical science, plants synthesize their own food—simple carbohydrates and sugars—through photosynthesis, utilizing solar photons, water, and carbon dioxide. Fertilizer does not supply caloric energy; rather, it functions like human vitamin supplements, providing raw mineral elements that enzymes and organelles require to construct amino acids, proteins, nucleic acids, and chlorophyll molecules.
In outdoor garden beds, biological cycles continuously replenish soil minerals as fallen leaves decompose, earthworms aerate substrate, and microbial soil webs release trapped nutrients. Indoors, however, potted houseplants live in confined artificial ecosystems. The limited volume of sterile peat, coco coir, and perlite inside a container holds a finite supply of nutrients. After two to three months of active watering, irrigation washes soluble mineral reserves out through drainage holes, leaving substrate nutrient-depleted.
To sustain cellular expansion, houseplants require sixteen essential chemical elements. Primary macronutrients include nitrogen (N), phosphorus (P), and potassium (K). Secondary macronutrients comprise calcium (Ca), magnesium (Mg), and sulfur (S). Finally, essential micronutrients—including iron (Fe), manganese (Mn), zinc (Zn), copper (Cu), boron (B), and molybdenum (Mo)—are required in trace quantities. According to educational bulletins from the University of Massachusetts Amherst Extension on fertilizing indoor plants, maintaining a balanced ratio between macronutrients and chelated micronutrients is vital to prevent chlorosis and developmental abnormalities.
Substrate pH and Cation Exchange Capacity
Even when a container substrate contains abundant mineral nutrients, root cells cannot absorb them if the soil acidity is improperly balanced. Substrate pH directly governs chemical solubility. For most tropical houseplants, the optimal root zone pH ranges between 5.8 and 6.5. Within this slightly acidic window, essential minerals remain dissolved in aqueous solution as positively charged cations (such as Kâş, Ca²âş, and Mg²âş) and negatively charged anions (such as NOâ‚â» and Hâ‚‚POâ‚„â»).
If potting soil becomes excessively alkaline—a common consequence of watering with hard, municipal tap water rich in calcium carbonate—vital micronutrients like iron, manganese, and zinc precipitate into insoluble chemical salts that roots cannot absorb. This phenomenon, known as nutrient lockout, results in severe interveinal chlorosis despite frequent fertilizer additions. Understanding and occasionally testing your substrate pH prevents frustrating diagnostic errors.
Decoding N-P-K Ratios for Indoor Foliage
Every commercial fertilizer package displays three bold numbers separated by hyphens (such as 10-10-10, 20-20-20, or 3-1-2). This sequence represents the guaranteed percentage by weight of the three primary macronutrients: Nitrogen (N), available Phosphate (Pâ‚‚Oâ‚…), and soluble Potash (Kâ‚‚O).

Nitrogen (N) — Foliage and Stem Vigor
Nitrogen is the fundamental building block of amino acids and the central component of chlorophyll, the green pigment responsible for absorbing sunlight. Foliage houseplants—such as monsteras, pothos, philodendrons, and ficus—have high nitrogen requirements. Adequate nitrogen produces deep-green, expansive leaf blades and sturdy stems. Nitrogen deficiency manifests as generalized chlorosis, where older lower leaves turn uniformly pale yellow while leaf veins retain faint green color.
Phosphorus (P) — Root Architecture and Energy Transfer
Phosphorus plays an essential role in adenosine triphosphate (ATP) synthesis, the chemical currency that transfers metabolic energy across plant cells. It stimulates early root branching, facilitates cellular division, and triggers floral bud initiation. While flowering houseplants (such as African violets and peace lilies) benefit from slightly higher phosphorus during bloom cycles, foliage houseplants need only modest phosphorus levels. Excessive phosphorus can interfere with iron and zinc uptake, causing induced micronutrient deficiencies.
Potassium (K) — Cellular Turgor and Stress Resilience
Potassium regulates the osmotic opening and closing of microscopic foliar stomata, controlling transpiration water loss and carbon dioxide gas exchange. It strengthens cellular cell walls, enhances cold and drought tolerance, and activates over sixty plant enzymes. A potassium-deficient houseplant develops necrotic, scorched brown leaf margins and weak, floppy stems that collapse under their own weight.
The Golden Ratio for Foliage Plants: 3-1-2
Decades of horticultural research have established that typical tropical indoor foliage absorbs nitrogen, phosphorus, and potassium in an approximate ratio of 3 parts nitrogen to 1 part phosphorus to 2 parts potassium. When shopping for houseplant fertilizer, formulas matching or approximating this ratio (such as 9-3-6, 12-4-8, or 24-8-16) closely reflect natural uptake patterns, preventing mineral salt imbalances from developing in container soil.
Liquid vs. Slow-Release vs. Organic Fertilizers
Indoor gardeners have access to three main categories of plant food, each offering distinct operational mechanisms, delivery timelines, and risk factors.

1. Liquid Synthetic Concentrates
Liquid chemical concentrates are the most popular choice for indoor growers. Because nutrients are fully dissolved in aqueous solution, root hairs absorb mineral ions immediately upon contact. Liquid feeding allows absolute precision: you can adjust concentration, alter feeding frequencies, and instantly flush excess salts if signs of over-fertilization appear. However, because synthetic salts are immediately active, miscalculating dilution ratios can cause severe osmotic root burn.
2. Coated Slow-Release Granules
Slow-release fertilizers (such as Osmocote) feature tiny porous prills coated with semi-permeable resin. When moisture and warmth penetrate the coating, small quantities of mineral nutrients diffuse steadily into surrounding soil over a period of three to six months. Slow-release granules provide exceptional convenience for busy gardeners, offering a steady “set-it-and-forget-it” baseline. However, in hot rooms or under intense grow lights, granules can release nutrients unpredictably fast, and individual prills cannot be easily removed once incorporated into the soil.
3. Organic Liquid Formulations
Derived from natural biological sources such as hydrolyzed fish emulsion, cold-water kelp meal, worm castings, and composted guano, organic fertilizers supply complex organic compounds alongside trace minerals. Organic formulas feed beneficial soil microbes, creating a healthier soil microbiome. They have low salt indices and virtually zero risk of root burn. The primary drawbacks include subtle organic odors, slower nutrient availability (since microbial breakdown is required), and occasional attraction of fungus gnats if overapplied.
Houseplant Fertilizer Selection Matrix
This reference matrix compares the primary houseplant fertilizer types, recommended dilutions, and optimal target plant groups.
| Fertilizer Type | Typical N-P-K Ratio | Application Cadence | Best Suited For | Risk Profile |
|---|---|---|---|---|
| Liquid 3-1-2 Synthetic | 9-3-6 or 12-4-8 | Every 2–4 weeks (half strength) | Monsteras, Ficus, Pothos, Philodendrons | Moderate (root burn if overdosed) |
| Balanced Liquid 1-1-1 | 10-10-10 or 20-20-20 | Every 4 weeks (quarter strength) | General mixed collections, Palms | Moderate (requires light dilution) |
| High-Phosphorus Bloom | 15-30-15 or 10-30-20 | Every 2–3 weeks during bud set | African Violets, Peace Lilies, Anthuriums | Moderate (avoid on pure foliage) |
| Slow-Release Prills | 14-14-14 or 15-9-12 | Once every 4–6 months | Large floor specimens, Hanging baskets | Low (gradual continuous release) |
| Liquid Fish & Kelp | 2-4-1 or 3-2-2 | Every 2–3 weeks (full strength) | Calatheas, Ferns, Sensitive Aroids | Very Low (microbial support, safe) |
| Low-Nitrogen Succulent | 2-7-7 or 1-2-2 | Once in spring and midsummer | Cacti, Haworthias, Snake Plants, ZZ | Very Low (slow metabolic uptake) |
The 4-Step Application Protocol to Prevent Root Burn
Applying fertilizer safely requires understanding osmotic pressure. When high concentrations of mineral salts enter the root zone, water molecules flow naturally from areas of low solute concentration to high solute concentration. If soil salt levels exceed root cell concentrations, moisture is pulled out of root hairs, causing cellular dehydration commonly known as “fertilizer burn.” Follow this four-step discipline to feed safely.
1. Never Feed a Dry Plant
The cardinal rule of indoor plant nutrition is never to apply liquid fertilizer to dry potting soil. When dry root hairs encounter concentrated fertilizer solution, they absorb salt ions too rapidly, resulting in immediate epidermal scorch. Always irrigate your plant with plain, lukewarm water first. Allow the substrate to become thoroughly damp for fifteen minutes, then apply your diluted nutrient solution.
2. The “Weakly, Weekly” Principle
Rather than applying full-strength fertilizer once a month, most experienced home gardeners practice the “weakly, weekly” routine. Dilute your liquid fertilizer to one-quarter or one-eighth of the manufacturer’s recommended dosage and apply it with every other watering during active spring and summer growth. This steady micro-dosing provides continuous nutritional support without causing sudden mineral spikes.
3. Monthly Soil Leaching
Even with careful dilution, unused mineral salts gradually accumulate in container substrate, forming unsightly white crusts along pot rims. Once a month during the growing season, perform a thorough soil flush. Carry containers to a sink or bathtub and pour plain water through the substrate until it drains copiously out the bottom for several minutes. This flushes away accumulated sodium, fluoride, and fertilizer residues, restoring clean chemical balance.
4. Combine Feeding with Proper Watering Techniques
When providing liquid nutrients, ensure the entire root volume is hydrated evenly. Many growers utilize gentle bottom watering methods for indoor plants, placing pots in shallow trays of diluted fertilizer solution for 30 minutes to allow capillary uptake without splashing salt residues onto delicate basal crowns.
Natural Amendments: Worm Castings and Compost Teas
For gardeners seeking organic approaches, natural soil amendments provide gentle, sustainable fertility that complements or replaces synthetic mineral salts. Pure earthworm castings (vermicompost) represent one of the most effective organic inputs available. Packed with humic and fulvic acids, beneficial bacteria, and readily absorbable trace minerals, worm castings improve substrate structure and increase moisture retention.
Incorporate a half-inch layer of worm castings into the topsoil of established houseplants each spring, gently scratching it into the surface before watering. With every subsequent irrigation, water filters through the castings, carrying mild, biologically active nutrients down into the root zone without any danger of salt scorch or root damage. Aerated compost teas and seaweed extracts provide additional plant hormones, such as auxins and cytokinins, that stimulate lateral root branching and strengthen leaf cuticles against fungal pathogens.
Dennis’s Advanced Troubleshooting: Fertilizer Burns & Deficiencies
Nutritional imbalances manifest in distinct foliar patterns. Here is how to diagnose and correct the five most common nutritional dilemmas based on my hands-on gardening observations.
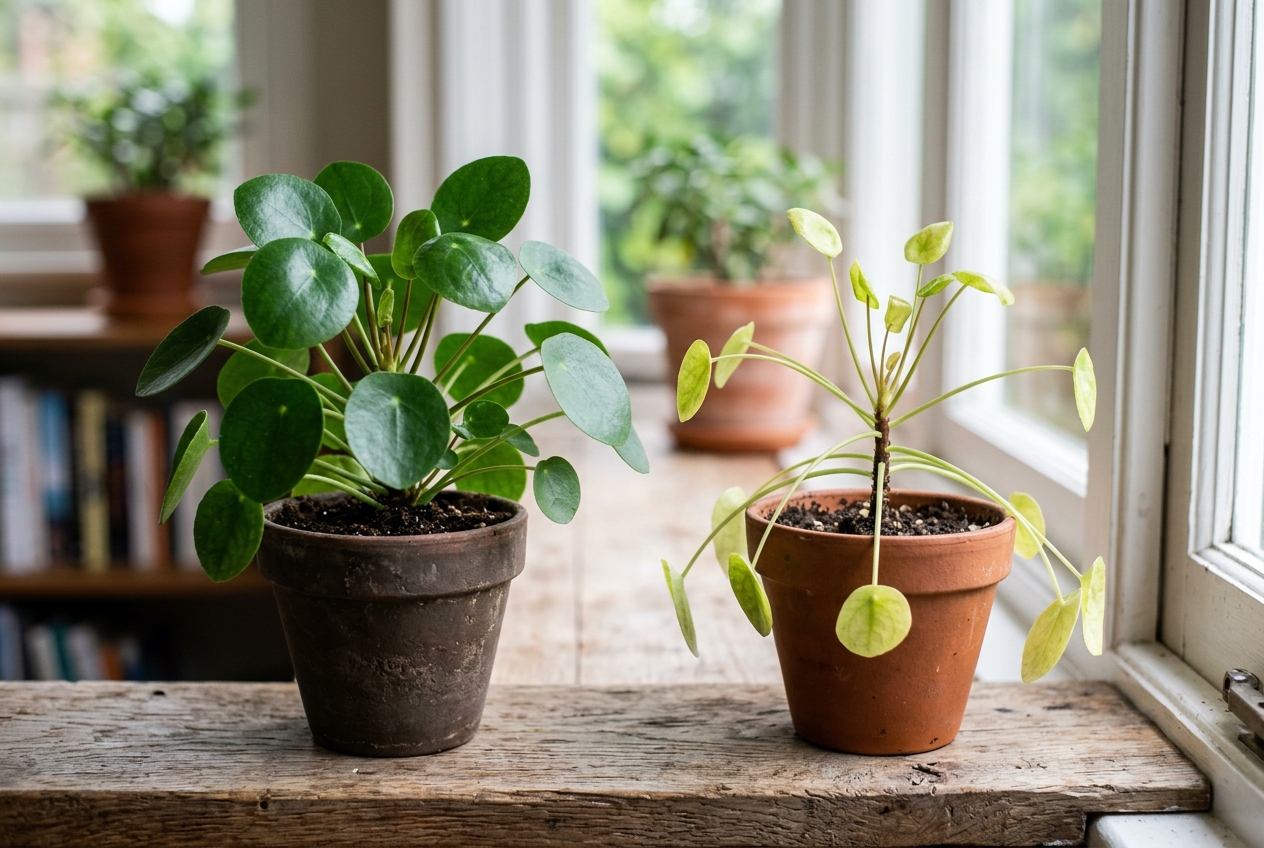
1. Brown, Crispy Leaf Margins with White Soil Crust
What the symptom looks like: Foliar tips and outer margins turn papery brown, curl upward, and look scorched, accompanied by a chalky white salt ring on the soil surface or pot rim.
Possible cause: Fertilizer burn caused by over-concentration or accumulated mineral salts drawing moisture out of root cells.
How to identify the cause: The symptoms appeared within 48 to 72 hours of a heavy fertilizer application.
What to do: Immediately leach the container with distilled water, running at least four times the pot volume through the soil to flush residual salts. Clip necrotic leaf margins with clean scissors, and suspend feeding for six weeks.
How to prevent the problem: Dilute all liquid fertilizers to half strength and flush pots monthly.
2. Uniform Yellowing of Older Lower Leaves (Nitrogen Deficiency)
What the symptom looks like: The oldest, lowest leaves turn pale, chartreuse-yellow, and eventually drop off, while new upper leaves emerge tiny and pale green.
Possible cause: Severe nitrogen deficiency. Because nitrogen is mobile within plant vascular tissue, the plant cannibalizes older leaves to translocate nitrogen to growing shoots. For a detailed guide on foliar chlorosis, consult our guide on why plant leaves turn yellow and how to fix them.
How to identify the cause: Stems remain firm, roots look healthy and white, but overall growth has completely stalled.
What to do: Apply a balanced, nitrogen-rich liquid houseplant fertilizer (such as 3-1-2) diluted to half strength. Noticeable color recovery in upper leaves will occur within ten days.
How to prevent the problem: Maintain a consistent monthly feeding schedule throughout spring and summer.
3. Interveinal Chlorosis on New Growth (Iron Deficiency)
What the symptom looks like: New emerging leaves develop bright yellow blades while the veins remain dark, prominent green, creating a striking webbed pattern.
Possible cause: Iron chlorosis, typically caused by alkaline potting soil (pH above 6.8) or hard tap water locking out iron absorption, as detailed in research from University of Missouri Extension on caring for houseplants.
How to identify the cause: The chlorosis affects only the youngest, newest leaves at shoot tips.
What to do: Apply a chelated iron foliar spray or drench the soil with an acidic, iron-fortified micronutrient fertilizer. Switch to filtered water to prevent substrate alkalinity.
How to prevent the problem: Use a balanced indoor potting mix with peat moss to maintain an ideal acidic pH between 5.8 and 6.5.
4. Weak, Spindly Growth with Abnormally Dark Foliage
What the symptom looks like: Leaves develop an unusually deep, dark-blue-green color, but stems are weak, soft, and flop over under minimal weight.
Possible cause: Excessive nitrogen fertilization. Surplus nitrogen forces rapid cellular elongation without adequate cell wall lignification, creating soft, succulent tissue that attracts sap-sucking pests like aphids and mealybugs.
How to identify the cause: Rapid, leggy stem growth combined with soft leaf cuticles.
What to do: Halt nitrogen feeding. Stake elongated stems and increase ambient lighting to encourage compact cell formation.
How to prevent the problem: Use balanced, lower-nitrogen formulas and adjust feeding to match available light levels.
5. Fertilizer Application Followed by Root Rot
What the symptom looks like: Within days of feeding, the plant wilts, stems turn mushy, and the soil fails to dry out.
Possible cause: Applying fertilizer to an already stressed plant suffering from waterlogged roots or fungal infection.
How to identify the cause: Stems are soft and black near the soil line; roots are brown and decaying.
What to do: Never fertilize a sick plant. Unpot the plant immediately, trim off rotten roots, discard the contaminated soil, and repot in fresh, unfertilized perlite-rich substrate.
How to prevent the problem: Only fertilize healthy, actively growing plants in well-draining soil.
Seasonal Feeding Schedules: Spring Through Winter
Indoor plants adjust their metabolic activity to seasonal light duration and temperature shifts. Matching your fertilization schedule to these biological rhythms prevents nutrient toxicity.
Spring (March to May) — Awakening and Vegetative Push
As lengthening days trigger fresh growth, resume feeding with a high-nitrogen liquid fertilizer (such as 3-1-2) diluted to half strength once every three to four weeks. If repotting into fresh commercial potting mix that already contains starter fertilizer, postpone liquid feeding for the first six weeks to avoid excess salt buildup.
Summer (June to August) — Peak Growth Window
During peak summer, photosynthetic activity is at its highest. Apply liquid fertilizer every two to three weeks, or follow the “weakly, weekly” method at quarter strength. Ensure pots are watered thoroughly before feeding, as warm indoor temperatures accelerate soil evaporation and salt concentration.
Fall (September to October) — Tapering Off
As daylight hours shorten and sun angles decline, reduce fertilizer frequency to once every six weeks at quarter strength. By late October, discontinue feeding entirely as plants prepare for their winter rest phase.
Winter (November to February) — Complete Nutritional Rest
During the short, dim days of winter, indoor houseplants enter a natural rest period where cellular growth slows significantly. Do not apply fertilizer during winter. Forcing nutrients into dormant root systems cannot stimulate growth without adequate solar energy and inevitably leads to chemical salt burns. Resume feeding only when you see active new leaf buds emerging in spring.
Master FAQ: Houseplant Fertilizer Answered
Should I fertilize a newly purchased houseplant right after bringing it home?
No, you should never fertilize a newly purchased houseplant right away. Commercial wholesale growers heavily fertilize greenhouse plants before shipping to produce vibrant, eye-catching foliage for retail display. Furthermore, commercial potting substrates frequently contain coated slow-release fertilizer prills that continue releasing nutrients for three to six months. Adding liquid fertilizer immediately after bringing a plant home creates an excessive concentration of mineral salts that can scorch root hairs already stressed by environmental relocation. Wait at least six to eight weeks before introducing supplemental liquid fertilizer, and only feed once the plant shows active new growth.
What is the difference between organic and synthetic houseplant fertilizer?
The primary difference between organic and synthetic houseplant fertilizers lies in their chemical origin and release speed. Synthetic fertilizers are manufactured from refined mineral salts (such as ammonium nitrate and potassium sulfate) that are immediately water-soluble and readily absorbed by plant roots. They allow precise dosing control but carry a higher risk of root burn if overdosed. Organic fertilizers are derived from biological materials like fish emulsion, kelp meal, and bat guano. They release nutrients gradually as soil microorganisms break down complex organic compounds, improving overall soil health with virtually zero risk of root burn.
Why is there a white, crusty residue on my plant’s soil and terracotta pot?
The white, chalky crust accumulating on potting soil surfaces and along the exterior walls of unglazed terracotta pots is caused by mineral efflorescence. When you water with tap water containing dissolved minerals or apply synthetic fertilizers, plants absorb water while leaving excess sodium, calcium, and fertilizer salts behind. In porous terracotta containers, moisture evaporates through the clay walls, depositing white crystalline salts on the surface. While harmless in small amounts, heavy salt buildup signals that the root zone is becoming saline. Flush the soil thoroughly with distilled water and wipe down the container with a damp cloth.
Can I use outdoor garden fertilizer for my indoor houseplants?
No, you should avoid using standard outdoor garden or lawn fertilizers for indoor houseplants. Outdoor fertilizers are formulated for vast volumes of open garden soil where rain and microbial activity disperse nutrients over large areas. Consequently, outdoor blends are significantly more concentrated and often contain harsh urea nitrogen sources that rely on outdoor soil microbes to break down into plant-usable forms. Applying outdoor fertilizers to confined indoor pots results in rapid ammonia toxicity and severe chemical root burn. Always choose a fertilizer formulated specifically for indoor houseplants with chelated micronutrients.
How do I know if my houseplant is suffering from over-fertilization or under-fertilization?
Differentiating between over-fertilization and under-fertilization involves checking the location and speed of foliar symptoms. Over-fertilization occurs rapidly, causing sudden browning and curling of foliar tips and margins, leaf scorch, premature drop of green leaves, and white salt crust on the soil surface. Under-fertilization develops gradually over weeks or months, characterized by slow, stunted growth, uniformly pale yellow lower leaves, thin stems, and small new leaves that fail to reach mature size. If in doubt, remember that under-fertilized plants recover quickly with gentle feeding, while over-fertilization can permanently kill root hairs.
Do low-light houseplants need as much fertilizer as plants in bright sunlight?
No, low-light houseplants require substantially less fertilizer than plants positioned in bright sunlight. Light is the fundamental energy driver of photosynthesis; when light levels are low, a plant’s metabolic engine operates at a decelerated pace, requiring fewer mineral building blocks. Applying standard fertilizer doses to shaded plants leaves unused mineral salts sitting in the root zone, leading to toxic salt accumulation. For low-light specimens like snake plants, ZZ plants, and cast iron plants, fertilize only twice a year—once in late spring and once in midsummer—at one-quarter strength, and withhold fertilizer entirely during autumn and winter.
Can I use epsom salts as a fertilizer supplement for indoor plants?
Epsom salt is magnesium sulfate (MgSOâ‚„), containing approximately 10% magnesium and 13% sulfur. While magnesium is the central atom in the chlorophyll molecule and plays an essential role in green pigment production, Epsom salt is not a complete fertilizer because it contains zero nitrogen, phosphorus, or potassium. You should only use Epsom salt if your plant displays confirmed symptoms of magnesium deficiency, which appears as interveinal chlorosis on older lower leaves. Dissolve one teaspoon of pharmaceutical-grade Epsom salt per gallon of water and apply once a month during spring. Routine overapplication can disrupt calcium uptake and create toxic salinity in potted soils.
Dennis P. Hansen
Dennis P. Hansen is a home gardener with a genuine passion for plants and the simple pleasure of growing them. He enjoys caring for houseplants, succulents, and other plants at home while continually learning from everyday gardening experiences. Dennis likes to share practical plant care tips, useful observations, and simple solutions that can help others grow healthier plants. He believes that caring for plants is a rewarding journey and that there is always something new to learn along the way.